I want...

 Weight Loss
Which CGM Is Best For You? My Experience
May 31, 2022 By
Leanne Vogel
![]()
 May 31, 2022
I’ve worn my fair share of continuous glucose monitors (CGM) over the years. I’ve seen apps come and go, and others completely rise to the occasion. Are you looking to use a CGM for your personal health goals and you’re not sure which to choose? I’m hoping these details can help!
I’ve just finished up an experiment using the Levels CGM app and the Nutrisense CGM app and I have some opinions!
The best markers to look for in your blood work.
Get the guideBut first…
If you’re unsure of why you would want to wear a CGM; and the benefits, I’ve written about that here: Continuous Glucose Monitoring. If you’re unclear how every body reacts differently to carbohydrates, and the mechanisms surrounding this, this post on understanding your carb tolerance is a must. If you’re still using HbA1C is a marker for overall glycemic health and therefore don’t think you have a glucose “problem”, here’s a resource on why I don’t like using HbA1c as a reliable marker.
Now that we have that covered, lets dive in.
There’s a lot of confusion around how CGMs work, the apps you need to read the data, and the features of each of the programs. So, let’s start from the ground up so that you fully understand the options so you can make a CGM decision that’s best for you.
So, You Want a CGM
Let’s get a few things straight so we’re all on the same page…
- In the USA, you are unable to go to the drugstore and just pick up a CGM. You must get a prescription for the device either through your doctor or through a provider, like Levels or Nutrisense who provide the monitor itself, and an app to decipher the information
- Most CGM apps use the same CGM device – FreeStyle Libre from Abbott
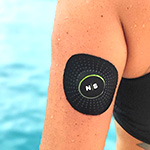
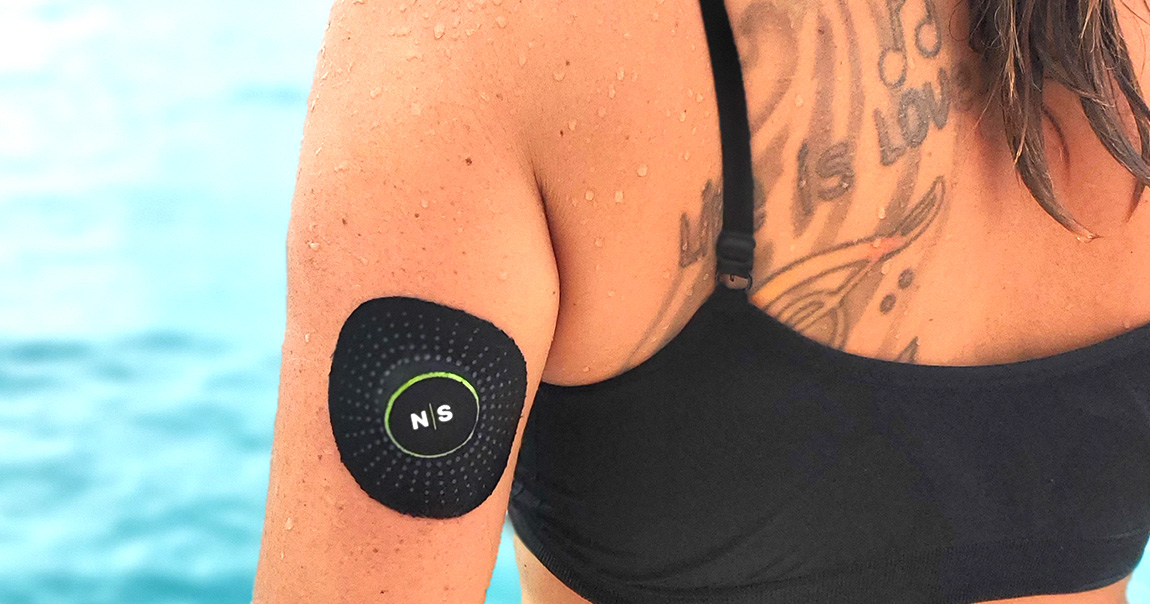
- You apply the FreeStyle Libre monitor (aka CGM) to your arm
- Then, you connect the CGM to your app of choice (I’ll be reviewing the Levels and Nutrisense apps side-by-side) so that the data is delivered to the app you’ve chosen to use to display the data
The app you choose makes or breaks your experience. The more data that’s displayed in a user-friendly way, the easier it will be for you (on your own) to understand how your body is responding to food, lifestyle, activity, and adjust course to improve your metabolic health.
The following are the 3 most-common choices for CGM apps. Again: these are the tools that enable you to understand the data the CGM spits out. Just seeing your glucose level moment-to-moment is not enough to truly understand the support your body needs.
You want an app that:
- Displays data clearly
- Allows multiple entry types, so you can track as much as you want. The more you’re able to input, the easier it will be to see trends in your metabolic fluctuations and spot opportunities to adjust diet/lifestyle/activities to support your metabolic health further
LibreLink – The Standard CGM App
If your doctor were to prescribe you a CGM, you would likely receive a FreeStyle Libre CGM, and be expected to use the app it comes with called LibreLink. The LibreLink app is intended and designed for diabetics whose doctor wants them to use a CGM to check on their glucose. What a diabetic is interested in when it comes to their moment-by-moment glucose readings is different than what someone looking to improve their metabolic health would want to see.
This app is not meant to be used for those interested in improving their metabolic health. The lack of data input makes it challenging to glean lessons and shift actions to improve markers.
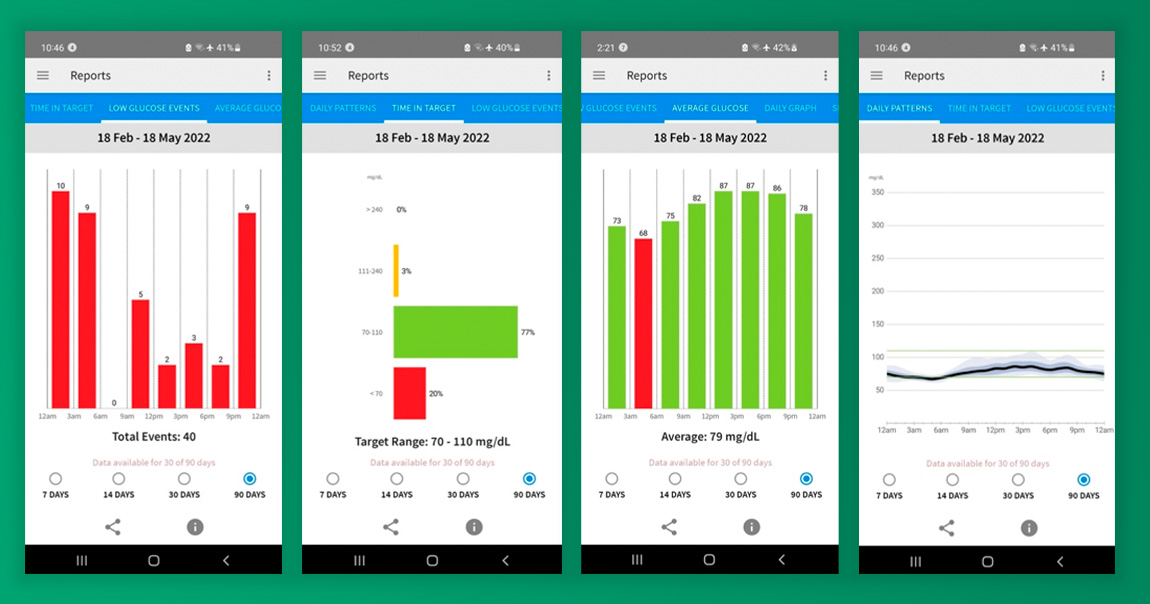
Reporting includes daily patterns, time in target (you can set your targets manually), low glucose event counts, average glucose in 3-hour increments, daily trends over 90 days.
If you’re working with a practitioner on gearing your diet to work best for your metabolic health, the LibreLink system can send data directly to them. And, the reporting summaries are helpful to seeing overall trends so that adjustments can be made to improve metabolic responses.
You’re unable to input events into the app including meals, exercises, or notes. This is a huge drawback.
Positives: Free, manually set your glucose range goal
Negatives: No inputting of personalized data
Summary: This app is not meant to be used for those interested in improving their metabolic health. The lack of data input makes it challenging to glean lessons and shift actions to improve markers. If you end up with this app, you’ll have to run a diet/activity log alongside this and compare side-by-side to learn how your body is responding to things.
Levels App
I’ve used Levels for a couple of years and was convinced that it really couldn’t get better than this. Coming from the LibreLink app, I was thrilled that; with Levels, I could input meals and activities and have meal logs ranked based on whether the meal took me out of my glucose range; and if it did, how long I stayed out of range.
The Levels app is integrated with LibreLink. This means, to use the Levels app you must first scan your CGM sensor with LibreLink. The Levels app then pulls data from LibreLink.
At the end of the day, the only real difference between LibreLink to Levels is that Levels allows you to manually input data so you can discover what meals and activities affect you, and they have a database of others’ reactions to foods so you can learn which foods you may react to.
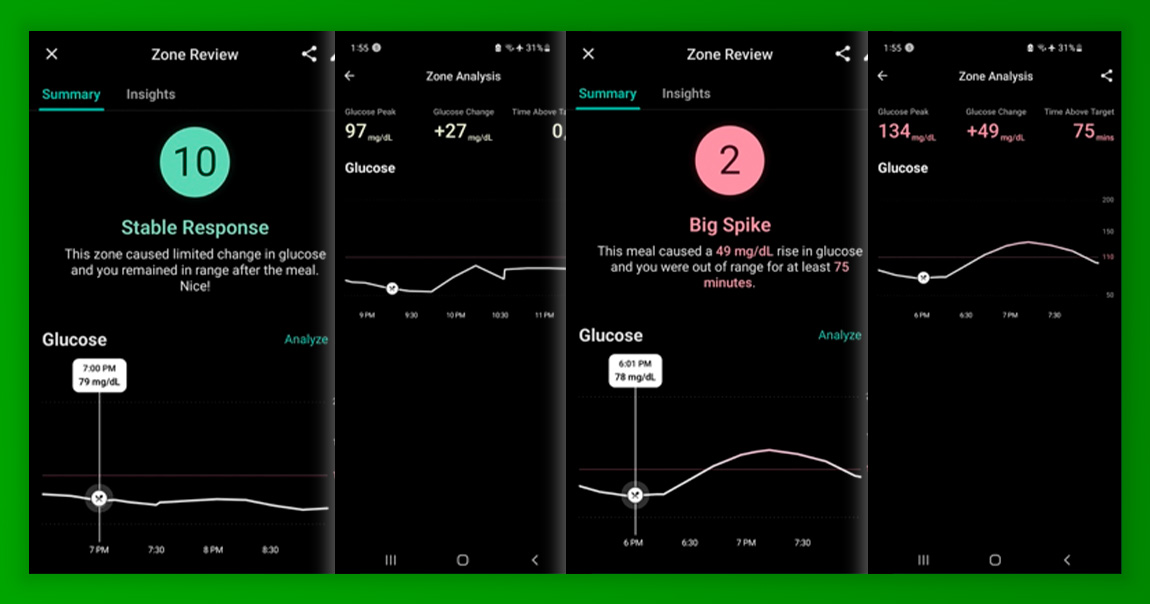
Here are some images of inside the Levels app, showing the ranking of meals including the glucose peak, glucose change (from start of the meal to 2 hours after), and the time spent over your glucose target:
Daily data is displayed like this, where you can see activities, meals and notes sprinkled across your daily glucose trend line, and the affects each log had on your trend line. And, for each day, you’ll see how long you spent above your goal, and stability overall:
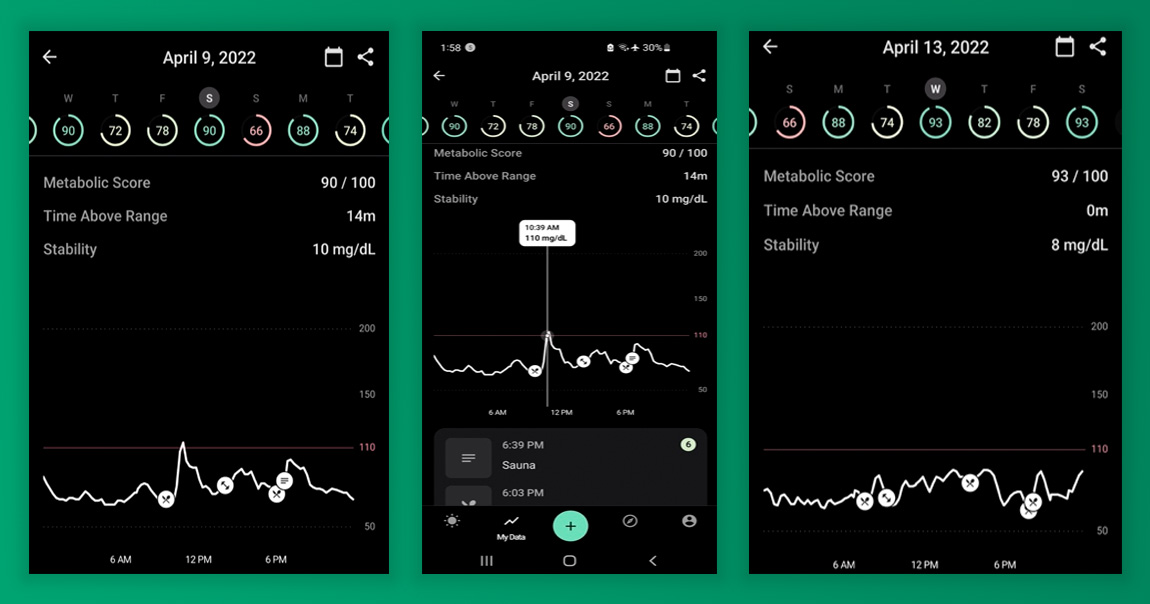
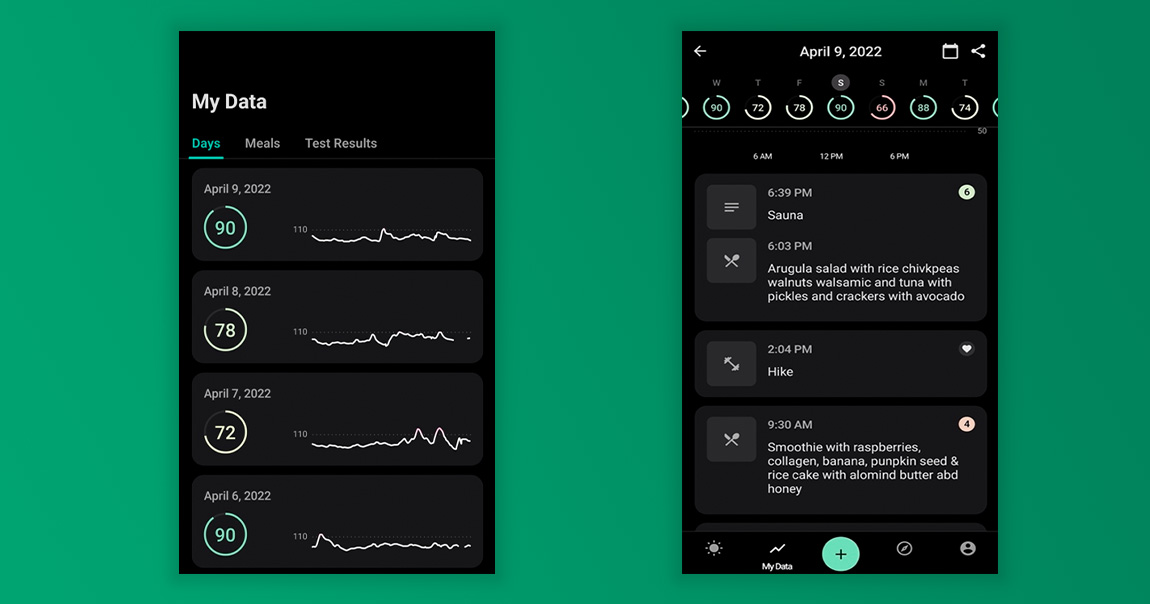
You can view your ranking, how well you did on a day-by-day basis on the My Data screen. I use days in the 90s as a template for a “good day” and days in the 70s as what not to do/where I could improve upon.
There are educational resources available through the Explore section of the app, where you can read educational blog posts, audios and videos covering a variety of topics from how to lower your carb intake, creative ways to swap out your favorite carbs, how exercising during a specific time of day can impact your glucose, the best foods for your glucose, and more. There is also the ability to work with a nutritionist, cost starting at $400 and looks to be outside of the app itself.
Positives: Manually track your activity and food logs to understand how they affect your glucose, compare your scores to others’ so you can learn what foods could potentially be a trigger for you also
Negatives: Lack of data, not as user-friendly as I would like it to be, scores are not computed for activities
Summary: A solid step up from LibreLink where you can track the foods you’re eating, activity you’re doing, and how all of this affects your glucose level in real time. The educational resources targeted at metabolic health can provide a general understanding of how to maintain healthful glucose levels, though to get personalized support, you’re looking at a minimum of $400 per month.
Nutrisense App
Do you like actionable data? Then I’ve found the app for you! Nutrisense takes the CGM experience to the next level.
Nutrisense is a standalone platform, meaning when you apply the sensor, you activate it on the Nutrisense app. No other app is needed (unlike with Levels as mentioned above, where Levels pulls the data from LibreLink so you have to have both).
Here is what you see unfolding as your day progresses:
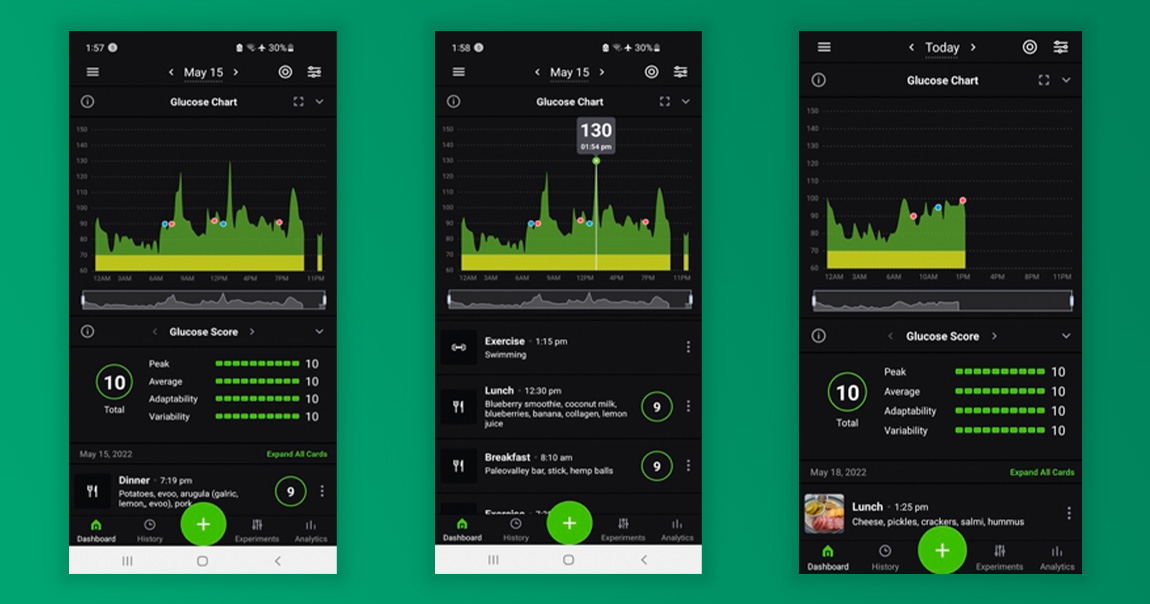
Each meal is scored based on four categories – peak, average, adaptability, and variability. To understand the ranking of each meal, click on the meal and the following data is displayed so you can better understand the ranking:
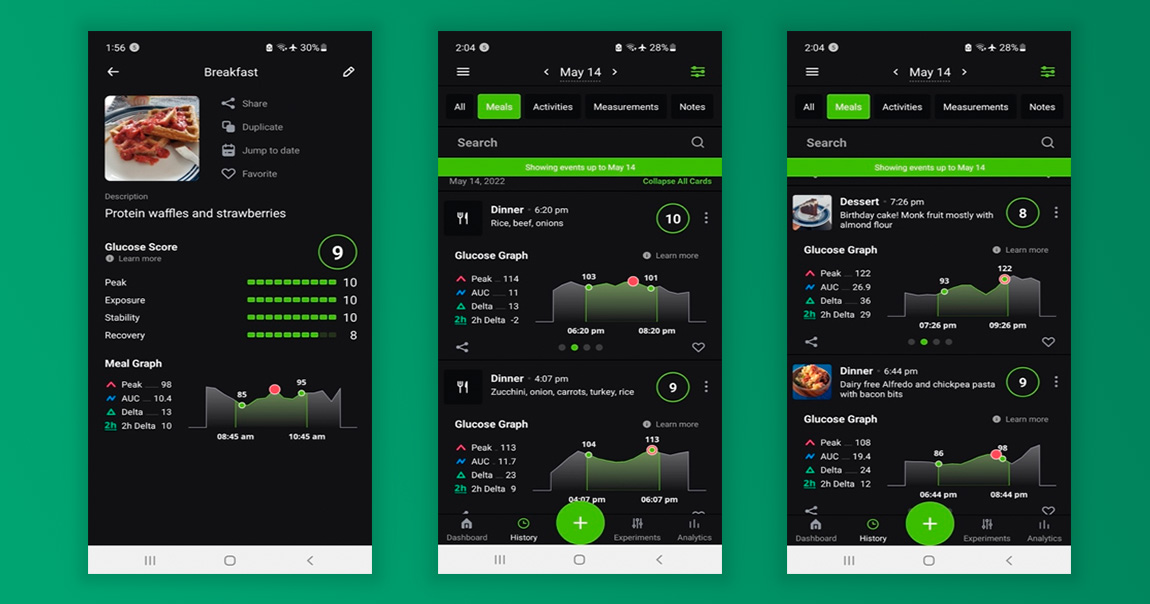
Peak – how high your glucose went in the 2 hours following the meal
AUC – the difference between the starting glucose number and ending glucose number (after 2 hours)
AUC – the “shape” of the glucose curve and a good proxy for the insulin response to manage that spike. This one’s a little tricky, so let me explain. AUC measures:
Delta – the difference between the highest and lowest points within the 2-hour interval after the meal or activity.
2h Delta – the difference between your starting glucose number and ending glucose number.
The most important numbers I look at are:
- Peak, I want it to be less than 130 ideally
- 2h Delta, best case scenario is between 0 and 3
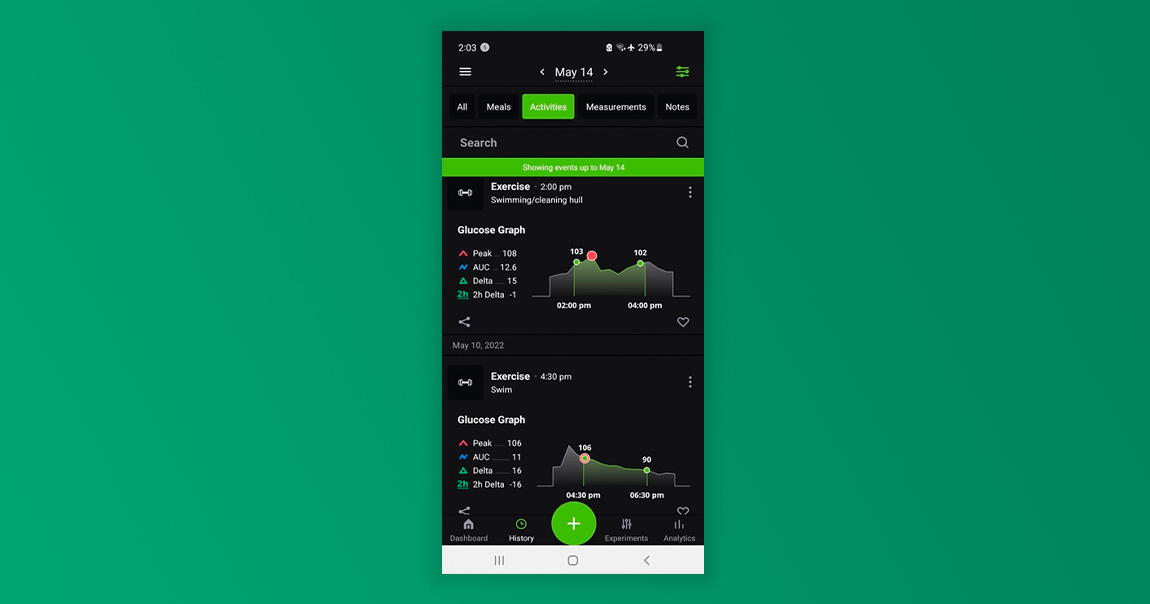
The greatest feature that I think sets Nutrisense apart from the others? You can see how your activities affect your glucose! Each activity is ranked just as food is so you can actively see on a day-to-day basis just how powerful movement is to your ability to regulate your glucose and improve your metabolic health!
Each time I move, I see my glucose come back down, and my overall score improve. This is motivation enough to get extra steps in, park farther away, take the stairs instead of the elevator, or go for a quick swim after dinner.
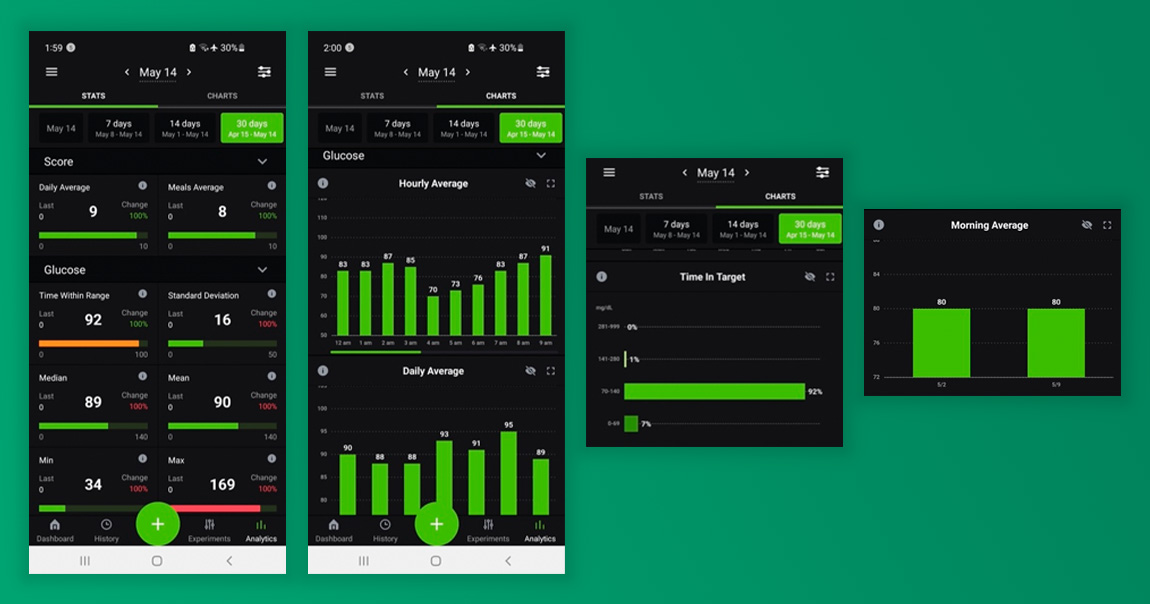
A lot of the time, when you’re in the thick of it and seeing moment-to-moment all the ups and downs of your glucose level, it can start to feel like you do not have a handle on things. This is why I love the Analytics section which gives you a high-level overview of your data – the big picture view.
Checkup on your hourly average, daily averages, time in target, morning average, max glucose, minimum glucose, you have all you could ever want on this dashboard. If you’re working on improving things, you can toggle from 30 days to 7 days to see how the shifts you’re making to your diet and exercise are making an impact on your trends.
If you’ve never tracked your glucose before and all this information feels a little daunting, Nutrisense offers 1-month of free support with a Registered Dietician with each purchase. I used this feature for the 6 weeks I used the device personally, speaking to the Dietician assigned to me as though I knew absolutely nothing about what I was doing.
I’ll be clear – this is not coaching, it’s support. The Dietician assigned to me outlined what values to look for, what goals to shoot for, and how to shuffle around my meals or workouts to get a better result. I sent her questions about why I had a more challenging time maintaining my glucose during end of my cycle, why my glucose shot up during the night, why my body responded slower to a specific meal that others, and she answered all of this.
The support will not get as detailed as a 1:1 coach, but if you’re new to using the app, or tracking glucose in this way, having personalized support inside the app to help you understand what you’re looking at and how to make your way around and action what you’re seeing, is invaluable.
Positives: scores are calculated for activities and meals, data is easy to understand and action, opportunity to work with a coach for the first while as you get the hang of it
Negatives: it’s a lot of data
Summary: The app makes it easy to view your glucose data granularly all the way up to a big picture view, making it easy to understand the loads of data the app provides. If you’re unclear about what you’re looking at, the free 1-month of support with a Registered Dietician is a great help. Overall, the app empowers the user to make shifts right there in the moment, to improve their metabolic health, and see it happening in real time.


Hi! I'm Leanne (RHN FBCS)
a Functional Medicine Practitioner, host of the Healthful Pursuit Podcast, and best-selling author of The Keto Diet & Keto for Women. I want to live in a world where every woman has access to knowledge to better her health.