I want...

 Weight Loss
Gluten-free Naan 2.0
March 29, 2012 By
Leanne Vogel
![]()
 November 3, 2017
") For more on the flavors of India series, check out: Dhal Aloo Kofta, Aloo Palak, Payasam Pudding, and Malai Kofta.
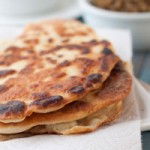
I’ve done it. I’ve mastered the art of the gluten-free naan. Seriously… it’s perfect and I’m so happy I get to share it with each and every one of you.
For more on the flavors of India series, check out: Dhal Aloo Kofta, Aloo Palak, Payasam Pudding, and Malai Kofta.
I’ve done it. I’ve mastered the art of the gluten-free naan. Seriously… it’s perfect and I’m so happy I get to share it with each and every one of you.
") This recipe has been reworked at least 19 times. I’ve gone through countless bags of rice flour, burnt my stomach on the cast iron pan (yes, I cook in a tank top sometimes), sliced my index finger and nearly bled out (exaggerating but it did hurt a bunch), singed my hair, and ate so much bread that there were moments I didn’t think I’d be able to continue.
But I powered on in hopes that with every tweak I made, I’d be that much closer to achieving the exact same stickiness, bubbled top, light, pull apart consistency that an authentic naan has.
What I’m trying to say is that it’s so ridiculous like the real thing.
This recipe has been reworked at least 19 times. I’ve gone through countless bags of rice flour, burnt my stomach on the cast iron pan (yes, I cook in a tank top sometimes), sliced my index finger and nearly bled out (exaggerating but it did hurt a bunch), singed my hair, and ate so much bread that there were moments I didn’t think I’d be able to continue.
But I powered on in hopes that with every tweak I made, I’d be that much closer to achieving the exact same stickiness, bubbled top, light, pull apart consistency that an authentic naan has.
What I’m trying to say is that it’s so ridiculous like the real thing.
") dude.
Even if you aren’t gluten-free, you should make these. I’ve brought samples to the office for my coworkers and no one believes it’s gluten-free! Oh yes, did I mention they’re dairy-free, too? Dairy-free naan. Ah!
dude.
Even if you aren’t gluten-free, you should make these. I’ve brought samples to the office for my coworkers and no one believes it’s gluten-free! Oh yes, did I mention they’re dairy-free, too? Dairy-free naan. Ah!
") yum.
yum.
")
")
- ¾ cup brown rice flour + more for flouring surface while frying, explained below
- ¼ cup + 1 tablespoon sweet rice flour
- ¾ cup + 3 tablespoon white rice flour + more for adding, explained below
- ½ cup potato starch
- ⅓ cup tapioca starch
- ½ teaspoon himalayan rock salt
- ¼ teaspoon cream of tartar
- 4 teaspoon demerara sugar
- 2 teaspoon gluten-free active dry yeast
- ⅓ cup full fat coconut milk
- 1 teaspoon coconut vinegar or apple cider vinegar
- 2 tablespoon coconut oil or ghee, melted-see note
- 2 whole eggs
- ½ cup warm water
- ghee or coconut oil for frying, approximately 8 teaspoon
- Combine dry ingredients in bowl of food processor with dough blade until combined.
- Remove the lid to the processor and add all wet ingredients but the water. Blend until combined. Continue to keep the machine running and add water slowly. Once it’s all added, allow to run for 3 minutes.
- If mixture is not pulling away from the sides of the bowl at the 3 minute mark, add additional white rice flour until it does, about 1 tablespoon at a time. My naan was perfect at 1.5 tablespoon added. If you’re not sure what consistency is perfect, remove the lid of the processor and poke your finger in the dough. If the dough sticks to your finger, it needs more flour. It it doesn’t stick, you’re good!
- Flour a clean surface with a bit of white rice flour. Remove the dough from the bowl and form into a ball. Place in a bowl, cover with a clean kitchen cloth and allow to sit in a warm place for 40 minutes. I like to place it on top of my oven after I’ve baked something. It’s a perfect spot!
- Once 40 minutes has passed, check on the dough. It should have increase in size by about 40%. In the bowl, cut the dough ball into 8 sections like a pie and cover with the cloth to keep from drying out.
- Heat a large cast iron skillet on medium-high heat for at least 5 minutes. When heated and about to place naan on the pan, drop 1 teaspoon ghee or coconut oil and allow to melt.
- Meanwhile, flour a silicon mat with a bit of brown rice flour. Place 1 section of the dough (you may find that the cuts in the dough have almost disappeared, this was just to give you an idea of the size of the dough to use for each naan, don’t worry about it too much) on the mat, and kneed for a couple of seconds. Roll into a rough ball and place plastic wrap over top. Roll out to about ¼-inch thick in an oval-like shape.
- Flip the silicon baking mat over so that it’s on top and peel the dough away from the baking mat so it’s left on the plastic wrap.
- Then, flip the dough on to your free hand and peel off the plastic wrap. You should now have a naan in one of your hands. Place it in the hot pan.
- Allow to cook about 1.5 minutes, until bubbles form and the bottom is golden. Flip over with a spatula and allow to cook for another 30 seconds. The trick here is to not overcook it on this second side. It should be slightly undercooked as it will continue cooking while it cools. I know this sounds ludicrous, but trust me!
- Place on a cloth or cooling rack and repeat another 7 times with the remaining dough, oiling the pan with 1 teaspoon ghee or coconut oil each time. If you do not oil, it will not work well.
- Serve immediately, or allow to cool completely and wrap in paper towel and store in an airtight container either in the fridge (will keep for 3-5 days) or freezer. When ready to eat, microwave pieces in the bag or container for 45 seconds each. If you do not have a microwave, or wish not to use it, you can steam the bread for 15 seconds.
- I have not tried this recipe with other flours. Well, I did… and none of them worked. I’m not sure if certain ingredients can be subbed out for others. I tried a vegan version with flax eggs and it didn’t work. I tried a potato-free version and it didn’t work. Something tells me that this wont be the last of the naan on HP. I’ll master a vegan version if it takes me another 19 tries! And if you master it before me… please share?
 Throw the dry ingredients in the food processor with the dough blade. I’m sure this could also be made in a stand mixer, I just don’t have one so I improvised.
 Allow to combine fully before adding all your wet ingredients.
 Just don’t add the water just yet.
") The consistency should be crumbly.
Keep the machine running and slowly add the water.
The consistency should be crumbly.
Keep the machine running and slowly add the water.
 Allow to beat for 3 minutes.
") You can peak through the top of the food processor to check the consistency. It should look something like this.
You can peak through the top of the food processor to check the consistency. It should look something like this.
 After the 3 minutes is up, take off the lid and test the dough with your finger. If dough comes with your finger, the mixture doesn’t have enough flour.
 Get the machine up and running again and add white rice flour until the dough pulls away from the sides, or until a finger inserted in the dough comes out clean.
") Get ready to pull the dough out of the bowl.
Get ready to pull the dough out of the bowl.
 Place on a white rice floured surface and form it into a ball, gently.
 Place the dough in a bowl and cover with a kitchen towel. Let it sit in a warm place for 40 minutes while you prepare for the next step, walk the dogs, dream of naan, or make a curry.
") A couple of minutes before the dough is ready, set out some brown rice flour, rolling pin, knife, plastic wrap and a silicon baking sheet. Also, now’s the time to get your cast iron on medium-high heat for 5 minutes before you start using it.
A couple of minutes before the dough is ready, set out some brown rice flour, rolling pin, knife, plastic wrap and a silicon baking sheet. Also, now’s the time to get your cast iron on medium-high heat for 5 minutes before you start using it.
 Eyeball or cut the dough into 8 sections in the bowl. Keep the dough covered when you’re not using it so it doesn’t dry up. Place the the 1/8 dough ball on a lightly floured silicon baking mat and kneed a bit before rolling it into a ball and covering the top with plastic wrap. Push down on the ball to flatted, then roll it out with your rolling pin.
") It should be about 1/4-inch thick.
It should be about 1/4-inch thick.
 Once you’re done rolling, flip the silcon baking mat over and peel away from the dough.
Then, flip the plastic wrap over so the dough is over your hand. You’ll have a long piece of dough over your wrist, palm and fingers. Place the dough in the heated pan and get excited!
Once you’re done rolling, flip the silcon baking mat over and peel away from the dough.
Then, flip the plastic wrap over so the dough is over your hand. You’ll have a long piece of dough over your wrist, palm and fingers. Place the dough in the heated pan and get excited!
") It will start to bubble. This is perfect. Let it cook for about 1.5 minutes until the bottom is golden. Flip over with a spatula and allow to cook for another 30 seconds.
It will start to bubble. This is perfect. Let it cook for about 1.5 minutes until the bottom is golden. Flip over with a spatula and allow to cook for another 30 seconds.
") The trick here is to not overcook it on this second side. It should be slightly undercooked as it will continue cooking while it cools. I know this sounds ludicrous, but trust me!
Place on a cloth or cooling rack and repeat another 7 times with the remaining dough, oiling the pan with 1 teaspoon ghee or coconut oil each time.
If you do not oil, it will not work well.
The trick here is to not overcook it on this second side. It should be slightly undercooked as it will continue cooking while it cools. I know this sounds ludicrous, but trust me!
Place on a cloth or cooling rack and repeat another 7 times with the remaining dough, oiling the pan with 1 teaspoon ghee or coconut oil each time.
If you do not oil, it will not work well.
") Sit back and enjoy your naan.
Then, go back to the kitchen to make another batch.
Story of my life.
~~~~~~~~~~~~~~~~~~~~~~~~~~~~~~~~~~
I had to move my hair appointment from Friday to yesterday so I could get in with a stylist that had experience doing side shaves. Yup, I did it… and I LOVE it!
Sit back and enjoy your naan.
Then, go back to the kitchen to make another batch.
Story of my life.
~~~~~~~~~~~~~~~~~~~~~~~~~~~~~~~~~~
I had to move my hair appointment from Friday to yesterday so I could get in with a stylist that had experience doing side shaves. Yup, I did it… and I LOVE it!
 Cool thing was, the stylist ended up being someone I knew from way back in the day, 7 years to be exact. Such a small world! I’m really happy with the way it turned out. I’ve always wanted to shave my head but I don’t think I’ll ever have the guts to do it… so this is probably as close as I’ll ever get!
This entry was tagged: bread, flavors of india, india


Hi! I'm Leanne (RHN FBCS)
a Functional Medicine Practitioner, host of the Healthful Pursuit Podcast, and best-selling author of The Keto Diet & Keto for Women. I want to live in a world where every woman has access to knowledge to better her health.