I want...

 Weight Loss
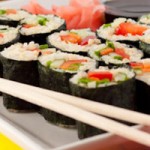
How to make Homemade California Rolls
September 8, 2011 By
Leanne Vogel
![]()
 March 29, 2017
") Homemade California rolls were a huge part of my life as a holistic nutrition student.
The girls and I would get together on a Saturday afternoon; each required to bring one random sushi ingredient, and the host would be responsible for preparing the grains.
Some weekends we’d have wild rice + yam rolls with spicy mayo, other times sprouted quinoa with marinated avocado. It was always different, creative and deliciously healthy.
Best of all, they couldn’t be simpler to make!
Homemade California rolls were a huge part of my life as a holistic nutrition student.
The girls and I would get together on a Saturday afternoon; each required to bring one random sushi ingredient, and the host would be responsible for preparing the grains.
Some weekends we’d have wild rice + yam rolls with spicy mayo, other times sprouted quinoa with marinated avocado. It was always different, creative and deliciously healthy.
Best of all, they couldn’t be simpler to make!
")
Required tools
- Sushi mat – you can find them in any grocery store in the Ethnic isle
- Sushi nori – again, in the Ethnic isle
- Bowl of warm water
- Cloth or paper towel folded into a 3″ x 3″ square
Ingredients
Grains – you’ll need about 1/4 cup uncooked grain and 1/2 cup water for every 2 rolls (ratio of 1 grain: 2 water). For this recipe we used:- 1 1/4 cup long grain brown rice
- 1/2 cup millet
- 3 1/2 cup water
- Vegetables – yams, spinach, cucumber, carrots, peppers, sprouts – sliced long and thin
- Protein – beans, hummus, soaked nuts, seeds, chicken, leftover burgers, steak – sliced long and thin
- Soy sauce or Braggs seasoning (gluten-free)
- Pickled or fresh ginger
- Wasabi
Step by step…
 1 ) Get your tools ready
2 ) Get your ingredients piled up
3 ) Place 1 sushi nori sheet on the sushi mat
1 ) Get your tools ready
2 ) Get your ingredients piled up
3 ) Place 1 sushi nori sheet on the sushi mat
 4 ) Lightly wet the paper towel or cloth in the bowl of water. Wipe the cloth across the entire nori sheet. You don’t want it too wet, lighter is better, just to soften the sheet up so it doesn’t crack.
5 ) Place 1/4 cup of cooked grain on the end of the nori, leaving about 1″ at the horizontal edge. Press flat.
6 ) Place filling on top being sure not to overdo it or you wont get the thing closed!
4 ) Lightly wet the paper towel or cloth in the bowl of water. Wipe the cloth across the entire nori sheet. You don’t want it too wet, lighter is better, just to soften the sheet up so it doesn’t crack.
5 ) Place 1/4 cup of cooked grain on the end of the nori, leaving about 1″ at the horizontal edge. Press flat.
6 ) Place filling on top being sure not to overdo it or you wont get the thing closed!
 7 ) Fold over the 1″ section over top of the filling, using the sushi mat as a guide.
8 ) Use your fingers to fold that section into the filling. Begin to roll the sushi mat, keeping the top edge free so it doesn’t get tangled in your nori. This takes a bit of practice but the best thing is – you can retry and it wont mess up anything!
9 ) When there’s about 1″ left at the end, dab your towel with a bit of water and wet the edge. This will help the edges stick together
7 ) Fold over the 1″ section over top of the filling, using the sushi mat as a guide.
8 ) Use your fingers to fold that section into the filling. Begin to roll the sushi mat, keeping the top edge free so it doesn’t get tangled in your nori. This takes a bit of practice but the best thing is – you can retry and it wont mess up anything!
9 ) When there’s about 1″ left at the end, dab your towel with a bit of water and wet the edge. This will help the edges stick together
 10 ) Press the roll down on the wet edge
11 ) Lightly squeeze the roll to allow the edge to seal.
12 ) Roll the mat around the California roll, lightly squeezing.
10 ) Press the roll down on the wet edge
11 ) Lightly squeeze the roll to allow the edge to seal.
12 ) Roll the mat around the California roll, lightly squeezing.
 13 ) Gently unravel the sushi mat and vwoala! You made your first California roll!
14 ) Okay, now you have a bazillion others to make. Chop chop!
15 ) Once complete, slice each roll with a sharp knife, making about 6-8 pieces per roll. Serve with wasabi, ginger, and Braggs.
13 ) Gently unravel the sushi mat and vwoala! You made your first California roll!
14 ) Okay, now you have a bazillion others to make. Chop chop!
15 ) Once complete, slice each roll with a sharp knife, making about 6-8 pieces per roll. Serve with wasabi, ginger, and Braggs.
") Although the days of late night study groups are a thing of the past, the California roll has become the staple in our house.
They’re great as a leftover for your lunch, make for a fantastic dinner party activity… and they make your thyroid happy. What’s more to love?
Although the days of late night study groups are a thing of the past, the California roll has become the staple in our house.
They’re great as a leftover for your lunch, make for a fantastic dinner party activity… and they make your thyroid happy. What’s more to love?
")
This entry was tagged: california roll, ginger, millet, rice


Hi! I'm Leanne (RHN FBCS)
a Functional Medicine Practitioner, host of the Healthful Pursuit Podcast, and best-selling author of The Keto Diet & Keto for Women. I want to live in a world where every woman has access to knowledge to better her health.