I want...

 Weight Loss
Photography 101: Overview
May 7, 2011 By
Leanne Vogel
![]()
 July 18, 2015
 So many images, good eats, and many lessons learned along the way.
Since sharing my thoughts on finding inspiration from other photography last week, a bunch of you asked me to write a photography post.
Eak, me? I am by no means a professional, but I’ll try to share the lessons I’ve learned along the way, and hope you find it interesting!
Camera used: Canon 50D
Favorite lens: Canon 50mm f-2.8
So many images, good eats, and many lessons learned along the way.
Since sharing my thoughts on finding inspiration from other photography last week, a bunch of you asked me to write a photography post.
Eak, me? I am by no means a professional, but I’ll try to share the lessons I’ve learned along the way, and hope you find it interesting!
Camera used: Canon 50D
Favorite lens: Canon 50mm f-2.8
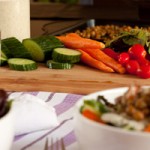
#1: Set up your background
Questions I ask myself while I’m preparing to take pictures of my food is:- What are the recipe’s ingredients?
- What ingredient stands out the most?
- What makes this recipe original?
- What colors do I want to accentuate in the dish?
 For this salad, I chose to setup a pile of the veggies that were in the salad, layout the homemade dressing, cups of water and wayyy in the back there you can see some chickpeas + roasted sweet potatoes. The pan didn’t make it to the final cut, but I had them on backup just in case.
 For this shot, I chose the color red – to match the strawberries + raspberries in the parfait. Then I asked myself, “What else do I have that’s red?” APPLES!
#2: Simplify + Remove Clutter
So, now that you have your background, colors, and ingredients all laid out, it’s time to take a couple of shots. The first few may/may not be horrible. It’s okay! You should be checking the screen of your camera to see if you’ve missed anything, or if things look out of place. As you can see, there was a spoon + fork that were cut off from the picture. Having their nibbly ends dangling in the shot looked bad, so I removed them. Much better, right?
#3: Light Bounce
We’ll have to go into further detail on light bounces in a future post, but this will give you an idea. Say you have your natural light coming from the right [as it is in the images below] how do you make sure that everything is lit up to prevent shadows? You got it, light bounces. You can use a white plate, foam board, paper towel, aluminum foil, mirrors, you name it. My favorite is the classic white plate OR a binder wrapped in aluminum foil. The picture on the left doesn’t have a light bounce – check out the bowl with the egg + pumpkin in it. Notice the difference? There’s other things that are wrong in these 2 pictures… but we’ll get to that next.
#4: Light Direction
So, we added a light bounce to the picture above, which helped with the lighting in the egg + pumpkin bowl. But did you notice that the nuts and raspberries were buried in shadows? No good! Again, imagine there is natural light coming from the right and a light bounce coming from the left. If something is in the way of the natural light, or the light bounce, whatever is in the middle isn’t going to get any lighting. This creates shadows. In the picture on the left the bowl with the egg is blocking the light bounce from getting to the walnuts + raspberries.
In the picture on the right the blue bowl is getting in the way of the natural light hitting the measuring cup.
In the picture on the left the bowl with the egg is blocking the light bounce from getting to the walnuts + raspberries.
In the picture on the right the blue bowl is getting in the way of the natural light hitting the measuring cup.
#5: Depth of field
I love creating that blur effect in the background of my images. It makes the featured dish so much warmer and inviting. Problem is, when you’re doing this, you have to make sure that everything in the dish is sharp and not accidentally blurry. This balance is called depth of field. According to wikipedia,depth of field (DOF) is the distance between the nearest and farthest objects in a scene that appear acceptably sharp in an image. Although a lens can precisely focus at only one distance at a time, the decrease in sharpness is gradual on each side of the focused distance, so that within the DOF, the unsharpness is imperceptible under normal viewing conditions.Aperture determines the depth of field/background blur of your picture. Lowering the f-number [aperture] will increase the background blur and increasing the f-number will decrease the blur. This is where the capabilities of your lens is very important. The pictures below were taken with a 50mm f-2.8 lens, we have another lens that has a f-4.5 maximum. I don’t use that lens often because I can’t get the same background blur.
 The dish on the left has a higher f-number than the dish on the right. This means that the left image has a lower depth of field than the right.
You may have to click on the image to enlarge, but a good indicator is the flake of cilantro on the spoon. In the imagine on the right you can see that the cilantro is blurrier than the cilantro on the left.
The dish on the left has a higher f-number than the dish on the right. This means that the left image has a lower depth of field than the right.
You may have to click on the image to enlarge, but a good indicator is the flake of cilantro on the spoon. In the imagine on the right you can see that the cilantro is blurrier than the cilantro on the left.
#6: Processing
You’ve set up your background, de-cluttered the shoot, adjusted lighting and nabbed the perfect shot. You head to your computer to upload the images and… process! I use a combination of:- Adobe Photoshop Lightroom 3: to re-size and edit the exposure + temperature of the image
- Adobe Photoshop CS5: edit crumbs, finger prints, sauce spills, etc.
 The images on the left are untouched.
The images on the right have had adjustments to exposure + temperature using lightroom.
The images on the left are untouched.
The images on the right have had adjustments to exposure + temperature using lightroom.
#7: Getting Creative [on a budget]
When we built our house we had every intention of using the dining room. We NEVER have people over, so it wasn’t long until I moved the dining room set into the kitchen and set up a creativity room to store all of my blog things. My favorites:- Trays
- Placemats
- Wrapping paper
- Kitchen towels
- White dishes
- Colorful casserole dishes
- Random cups + mugs [still have yet to find a plain white cup + saucer…grrr]
- Fake flowers
- Cutting boards
- Asked my friends and family to watch for sales
- Purchase seasonal items after the season – you should see all of the Christmas stuff I have for next year!
- Stop at every single dollar store I see
- Set up a budget for myself on a prepaid card
- Look for damaged goods so I can request a discount
 So there you have it, an overview of the photography tools + tips I’ve learned along the way.
Photography series: Homemade mini studio
If you found this post helpful, what other photography topics would you like me to cover?
What are ways you improve your photography?
So there you have it, an overview of the photography tools + tips I’ve learned along the way.
Photography series: Homemade mini studio
If you found this post helpful, what other photography topics would you like me to cover?
What are ways you improve your photography?
This entry was tagged: home projects, how to, photography


Hi! I’m Leanne (RHN FBCS)
a Keto Nutritionist, host of The Keto Diet Podcast, and best-selling author of The Keto Diet & Keto for Women. I want to live in a world where every woman has access to knowledge to better her health.